Availability All Editions
In the Resource Pool, you can find all your roles in a clear configurable list view.
- How Roles Help You
- How to Find
- Adding Roles
- Editing Role Details
- Editing Role Allocations
- Deleting Roles
In this video we show you how to configure roles in Meisterplan.
How Roles Help You
Roles describe how an employee contributes to a project, like, as a “Project Manager“ or “Developer“. By adding roles to projects, you can start planning long before you know which resource or team will work on the project.
Once you move from the rough to a detailed plan, use the Staff Role feature to find the right resource or team for your projects.
In Meisterplan, you can plan individual resources and entire teams for your projects alongside roles. You can also assign velocity to teams or roles so that story points imported from an external tool are automatically converted to person days in Meisterplan. Find out more about how teams and roles interact in the article When to Use Teams vs. Roles.
How to Find
You need to have the Edit Resource Pool and Absences right to access this function.
In the left sidebar, click Resource Pool and select Roles:
In the list, you can see an overview of the roles with selected role details. If you have selected a portfolio that is based on a resource filter, the list will only display roles that are included by the filter (OBS, primary role). Learn more in the Portfolio Filters - Details article.
Click on a column header to sort its content alphabetically or numerically (depending on content type). Use the Search field to search all columns for a word or phrase.
Configuring Your View
The role view is only configured per user. If you reconfigure your columns, only you will see the changed configuration.
Filter Roles
To filter the role list for roles with certain values, click Filter:
You can select from the following fields:
- Top level OBS, e.g., department
- Resource Manager: displays roles with the selected resource manager
You can use several filters at the same time to further limit the results. Learn more in the Ad-Hoc Filter article.
Configure Columns
To see only the role details that are relevant to you, customize the role list. Click Configure Columns to select the information you want to display in your preferred order.
You can also change the order of the columns by dragging and dropping them in your preferred order.
Find a list of all fields that you can select as columns here.
Exporting Your View
For this function you need to have the Export Data right.
You can save an Excel file of your configured view by clicking Export to Excel.
Adding Roles
You can add a new role in Meisterplan either manually or collectively by importing them.
Adding by Import
There are several options for importing roles collectively, and some options can also be automated:
- Adding roles from other tools
- Copy & Paste from spreadsheets
Adding Manually
In the role list, click Add Role and fill in the fields. Name is the only required field, the others are optional.
Find an overview of all fields with explanations here.
Editing Role Details
To edit an individual role, click on the role in the list view. The following fields can be edited directly in the list:
- Name
- OBS (e.g., department, location)
- Resource Manager
You can also edit individual roles in the detailed view. To do so, move your cursor over the role entry in the list and click the icon at the end of the line:
Fields
In the section General, you can find the following fields.
- Name: Required Field
- Resource Manager: Assign a resource manager for each role. In the Team Planner, you can filter the displayed resources, teams and roles by resource manager.
- Cost per HourPro Premium: Basis for calculating allocation cost; also used for resources and teams with this primary role when no cost per hour is designated for the resource or team; the field always displays the current cost per hour; click the calendar icon at the end of the field to enter several costs per hour with different past or future Valid From dates. Learn more in the article Importing Past Costs per Hour Retroactively. Under Views & Areas in your user group, you need to have the Access Financial Data right to access this field.
-
Billing Rate per HourPro Premium: Basis for calculating allocation and total benefit; in the Project Details' section Roles and Resource - Billing Rates, you can apply these standard billing rates from the Resource Pool;
Under Views & Areas in your user group, you need to have the Access Financial Data right to access this field.
- Cost Type: Must be either OpEx or CapEx
- OBS: Use the organizational breakdown structure to define, for example, the department and office of the role; learn more in the Managing OBS article.
- VelocityPro Premium: Basis for calculating person days from story points for projects connected via Jira or another tool.
Role Capacities
The capacity of a role is the sum of the capacities of all resources and teams with this role as primary role (project roles do not count towards the base capacity of a role), as well as any additional entered role capacities. You can change the capacity to simulate your plan with additional positions.
Role capacity changes are scenario-dependent and are only valid for the scenario that is currently selected in the header
In the Role Capacities in "[current scenario]" section, you can add capacity changes for roles, either temporary or permanent changes.
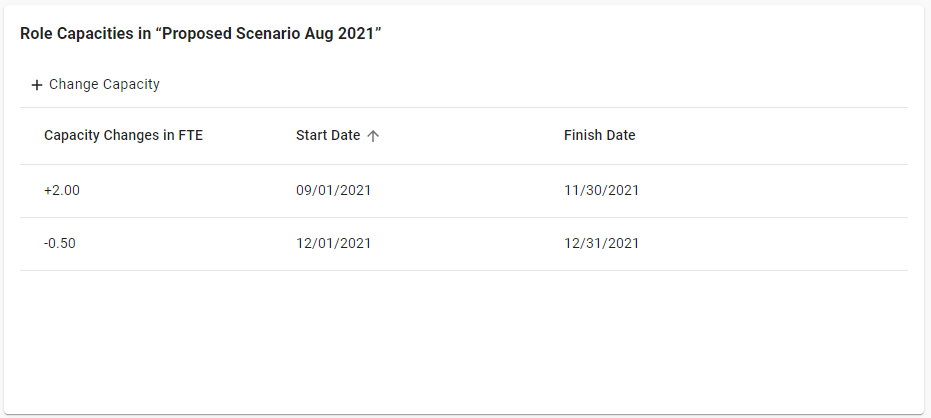
Click Change Capacity and add the following details:
- Capacity Change in FTE: Capacity of the role in the time period specified; the capacity change is added to (or subtracted from) the base role capacity ( sum of all resource and team capacity with this role as primary role).
- Start/Finish Date: This field is optional; if no dates are entered, the change is valid for the time period between the previous and the following capacity change. If there are no other capacity changes, the capacity change always applies.
To edit an existing role capacity change, simply click the respective row and edit the capacity change. The change will be saved automatically.
To ensure the retrospective capacity remains correct, we recommend keeping past capacity changes. The following options help you maintain the correct sequence of different role capacity changes:
| Use Case | What to Do |
| You would like to plan with a different capacity change from a certain date. | Enter the new capacity change with the start date. Meisterplan will automatically set an end date to the previous capacity change. |
| You would like to adjust an existing capacity change for a limited time period. | Enter the new capacity change with the start and end date. Meisterplan will automatically set an end date to the previous capacity change and create a new entry with the original change after the temporary change's end date. |
| You would like to reset a current capacity change. | Enter a capacity change with 0 FTE and the start date. Meisterplan will automatically set an end date to the previous capacity change. The 0 FTE change will not be added (because it is not a capacity change but the default). |
Exceeding the License Package
Adding additional role capacity will count towards your license consumption and may exceed the number of resources available in your current package. Contact the Meisterplan administrator in your organization if you are unsure about the number of role capacities you can add for your planning.
Editing Role Allocations
When you click the tab Allocations in the details view of a role, you can see all of the projects to which the role is allocated, the respective allocation values, and the overall capacity. Below, you can see the teams and resources with this role as primary role. Click the arrow after the name to expand the list of projects.
If a project is assigned to a program, the program will also be displayed. If the role is assigned to multiple projects in the same program, the program will display the sum of allocations for that role.
In the toolbar, you can select the allocation unit, the zoom level and the Plan vs. Actual comparison.
Hover over a section in the histogram to see the total capacity, the allocations, and the remaining available capacity for this time period.
To edit the allocations, the same options that you can find in the Team Planner's Time Grid Mode are available.
Adding a Project
To add a new project allocation for a resource, team, or role move your cursor over the resource and click the plus icon. Next, enter the project's name or project key into the search field and confirm with ENTER.
A new row will be added with the project's name and the allocation value 0. You can change this at any time.
Editing Allocation Values
To edit single allocation values in cells, click the cell and enter the new value. With our keyboard shortcuts, you can select and edit multiple cells at once, like with copying or overwriting cells.
Editing an Entire Allocation
Click the three dots next to the name of the project to open the context menu. There you will find the following actions:
- Staff Role (only for roles): Open a new view where you can staff available resources and teams to role-level allocations. Learn more in the article Staff Role.
- Replace Role (only for roles): All of the selected values will be allocated to the desired role, and the existing allocation will be deleted from the current role.
- Replace Resource/Team (for resources and teams): All values will be allocated to the desired resource or team, and the existing allocation will be deleted from the current resource or team. Learn more in the article Team Planner - Replacing Resource Allocations. You can replace the entire allocation, only the overallocation or a percentage of the allocation.
- Unstaff to Role (for resources and teams): The entire allocation will be transferred back to the role, and the existing allocation will be deleted from the current resource or team. Learn more in the article Team Planner - Replacing Resource Allocations.
- Change Project Role (for resources and teams): The resource or team will remain allocated to the project, but in the newly selected role.
- Remove from Project: The resource, team, or role will be unassigned from this project.
- Open Project: Open the project's details.
Editing Part of an Allocation
Select one or more cells and click the three dots in the blue bubble above the selected cells. There you will find the following options:
- Add Remaining Capacity: The remaining available capacity of the resource, team, or role will be added to the selected cells.
- Allocate in Percentage: The selected allocation cells will be filled with the specified percentage of the resource's, team's or role capacity. Existing values will be overwritten.
-
Replace Resource/Team (for resources and teams): All of the selected values will be allocated to the desired resource or team, and the existing allocation will be deleted from the current resource or team. You can replace the entire allocation, only the overallocation, or a percentage of the allocation.
- Unstaff to Role: Once you select Replace Resource/Team, you will be able to unstaff the entire allocation back to the role, only the overallocation or a percentage of the allocation. All of the selected values will be allocated to the role, and the existing allocation will be deleted from the current resource or team. Learn more in the article Team Planner - Replacing Resource Allocations.
How a Role's Available Capacity is Calculated
When hovering over the grid, you will see a hint with the available capacity of the role. This is calculated for each time period as follows:
For the selected time period of the zoom level (i.e. either week, month, quarter, or year), the available capacity of all resources and teams with this role as their primary role is summed. If applicable, additional role capacity is added. The sum of these capacities is the average availability of the role for that time period.
Learn more about calculating role capacities in the article Role Capacity Changes.
Compare Actuals with Plan
Click Compare Actuals with Plan in the toolbar to view the comparison of allocations and actual time worked for the respective role. The gray values show the actual time worked; the values below show the planned allocations:
You can edit the allocations as described above; however, the actuals are read-only.
Deleting Roles
To delete a single role, move your cursor over the role entry in the list view and click the trash can icon at the end of the line. You can also delete a role in the role detail view.
To delete several roles at once, check the boxes on the left side of the roles and click Delete. To select all roles displayed in the list, check the box to the left of the column headers.
Deleting a role has the following consequences:
- Allocations will also be deleted: Direct allocations of this role in the scenario or Plan of Record will be deleted together with the role, both current and past allocations.
- Deletion of the primary role: Resources and teams with the deleted role as primary role lose their primary role.
-
Deletion of the project role:
- Allocations of resources and teams with the deleted role as primary role and project role lose their project role.
- Allocations of resources and teams with the deleted role as project role but not as primary role will be changed to the primary role of the resource and team.