Availability All Editions
Use copy and paste to easily use import new and updated allocations into Meisterplan using a list. This helps you plan your portfolio with the most up-to-date data.
- Prerequisites
- Where to Find
- Choose Type of Data and Prepare
- Download Example Spreadsheet
- Fields That Can Be Imported
- Importing Several Allocations Per Project
- Date and Number Formatting
- Step 1: Copy & Paste
- Step 2: Assign Fields
- Step 3: Validate & Edit
- Result
In this video we will show you the basics of how the Quick Import works, using the project import as an example:
Prerequisites
Required User Rights
For importing allocations as described in this article, you need to have the following rights:
- Integrations > Import Data
- Either the right Resource Managers Can Always Edit Allocations of Their Own Resources, Teams, and Roles, or under Edit Allocations, at least the option Role Allocations.
- Under Project Field Rights, you need to have at least Read Only rights for the Project Key field.
- To import allocations into the Plan of Record, you need to have the Edit Plan of Record right; to import them into a scenario, you need to have the edit rights for the respective scenario
Supported Formats
For the quick import, you can simply copy data and paste it into Meisterplan. You can therefore use all file formats in which you can copy data.
Where to Find
In the left Sidebar, click Import and Export:
If you would like to import your allocations into a different scenario than the one currently selected, switch to that scenario by clicking Scenario or Plan of Record in the top left of the header:
Choose Type of Data and Prepare
Click Allocation List and then Start Import:
You can add new allocations and update existing ones. Find a detailed overview of when allocations can be updated here.
Download Example Spreadsheet
If you don‘t have a spreadsheet of allocations available, download our example spreadsheet of allocations. This example serves as an outline for configuring your allocation related data. You can also use the example spreadsheet to run a test import in your Meisterplan system.
Your existing allocations will not be overwritten or deleted by the test import. You can delete the imported sample allocations at any time.
To successfully import your allocations, your spreadsheet should contain one line per allocation, and a column for each data field you would like to import.
Downloading Existing Data
To easily get required data such as Project and Resource Keys, simply export the relevant data using the Export to Excel. You can also update existing allocations quickly by exporting the allocation list, updating the Excel file and then re-importing the data.
Fields That Can Be Imported
These are the required fields that your spreadsheet should contain:
- Project Key: Project Key of existing project; used to identify a project but cannot be used to update a Project Key
- Resource/Team Key or Role: Resource or Team Key of an existing resource or team, or the name of an existing role; the Resource or Team Key is used to identify a resource or team but cannot be used to update the Resource or Team Key itself
- Start: start date of the allocation; for the correct format see here
- Finish: finish date of the allocation; for the correct format see here
- Allocation: allocation value in FTE, hours or person days; for the correct format see here
This field is optional:
- Project Role: define a project role if a resources’ role is different from their primary role
Importing Several Allocations Per Project
You can import several allocation segments for the same project and same resource, team, or role, but their time periods must not overlap.
Date and Number Formatting
In the Date and Number Formatting for Quick Imports article, you can find all details on how to format dates and numbers in your spreadsheet to ensure they are imported correctly.
Step 1: Copy & Paste
Copy the desired data from your spreadsheet and paste the data in Meisterplan (e.g., using CTRL+V). In this step, you can copy and paste different data as often as needed.
Step 2: Assign Fields
If your imported column name matches an existing field in Meisterplan, Meisterplan will assign it automatically. If you’d like to change or add a field assignment, just drag and drop the Meisterplan field to the desired location. This step ensures your spreadsheet data maps to the appropriate Meisterplan field.
If your spreadsheet contains columns that cannot be matched with Meisterplan fields, they will simply be ignored and the data from the unassigned columns will not be imported.
Step 3: Validate & Edit
Validation and Error Correction
In this step, you can validate and edit your allocations before import. Simply edit the highlighted field by clicking on it. Fields highlighted in dark red indicate an error that will prevent the complete line (i.e., the allocation) from being imported.
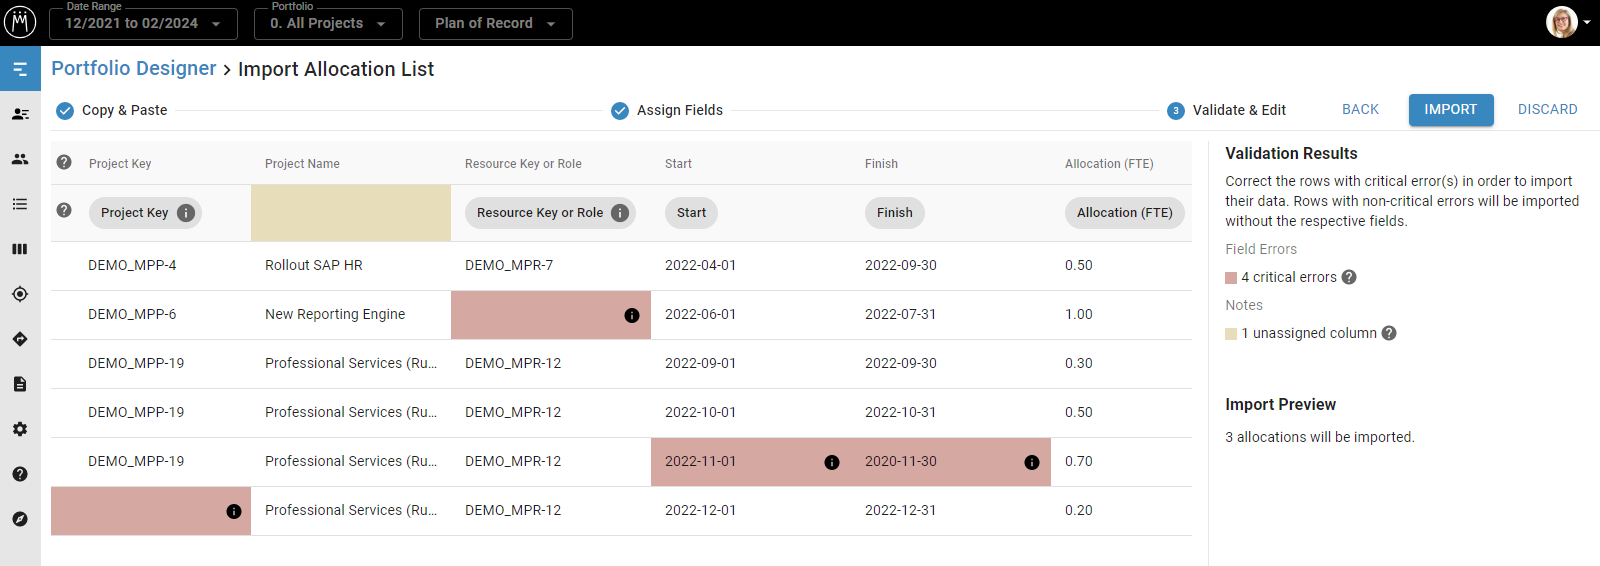
Once you’ve corrected all errors, click Import. Your data is now available in Meisterplan.
Update Existing Allocations
Exact Matching of Projects and Resources
Importing new and updating existing allocations is only possible if the projects and resources, teams or roles in your spreadsheet exactly match the projects and resources, teams, or roles in Meisterplan. Projects, resources, and teams are identified by their Project, Resource, or Team Key respectively. Roles are identified by their name.
Updating Existing Allocation Segments
If there is an allocation for the same resource and the same project during the same time period in Meisterplan, the new allocation from the spreadsheet will overwrite the existing one. However, only the allocation period listed in the spreadsheet will be updated. Existing allocations outside this time period will remain unchanged.
Example:
The allocation of "Wang, Henry" (yellow) was updated for the entire time period. The allocation of "Fournier, Zoe" (red) was only updated for the time period specified in the table, and the first half of the allocation period remains unchanged.
Allocations in Project Breaks
Importing an allocation for a time period with a project break will remove the project break.
Result
Imported Allocations
Once you've clicked Import, your allocations will be available in the Plan of Record or the selected scenario.